How to Make a Grinch Out of Wood
Please note: Posts may contain affiliate links or sponsored content. For more of our disclosure policy, click here. For more of our privacy and cookie policy, click here. As an Amazon Associate I earn from qualifying Amazon.com Services LLC purchases.
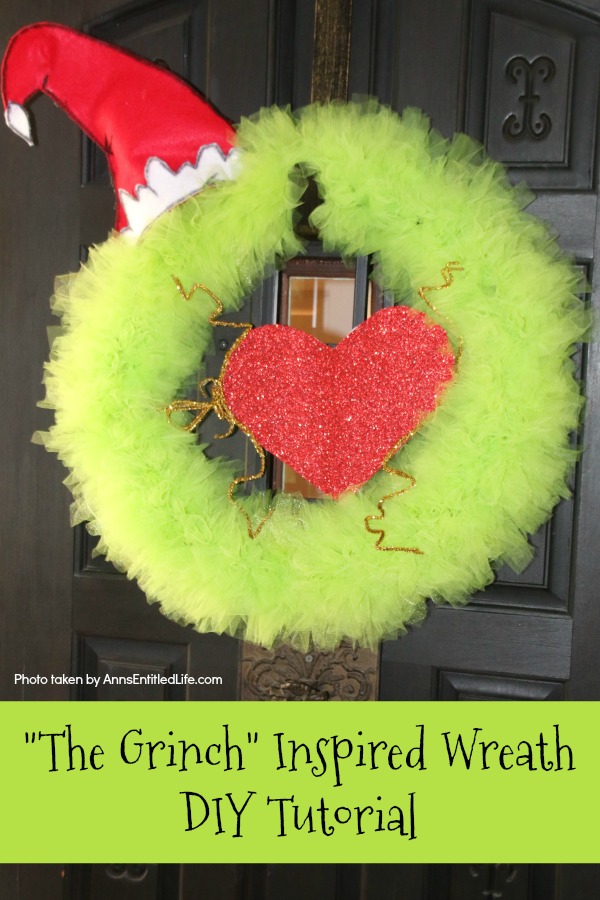
A beautiful How the Grinch Stole Christmas inspired wreath sure to make even the coldest heart burst! This step by step tutorial is complete with (free) pdfs for the hat and heart for you to print and make exact. This wreath will look great on your front door, over your mantel, or on a wall. Truly unique holiday decor!
The Grinch Inspired Wreath DIY Tutorial
Mr. Max's favorite toy is The Grinch. My mother purchased one for my Hubby a few years ago. Hubby is the world's WORST gift-getter. Worst. Ever. Nothing purchased for him is right (ironically, my mother (who is also a poor gift-getter) has done better for him than just about anyone else). He used to be highly entertaining – he'd crab about a gift, and we would all laugh (at him), but after a while the shtick got old. So, one Christmas my mother bought hubby a Grinch plush toy. Hubby, in turn, gave it to Mr. Max.
Mr. Max played with that thing a lot. When traveling down to Florida, we would pack up Max's favorite toys – including the Grinch – and bed(s) and then start driving.
One year on the drive down I looked at Hubby and said, "What is that SMELL!?!?"
It turns out it was the Grinch. Max's goob is not exactly fragrant, and The Grinch ended up malodorous. Truly. It smelled disgusting and polluted the car.
We bagged up Mr. Grinch for the rest of the drive down to Florida, and then Hubby went on a hunt for a new Grinch once we arrived down south. Hubby paid-up for a new one on fleabay, and Mr. Max had two Grinches for a while! Last year when we drove down to Florida, the original Grinch hit the trash can on our way out of town.
The "new" Grinch now stinks, and Hubby is gonna have to find one – again.
Needless to say, The Grinch is a well-known icon in our household.
So, when my niece suggested "we" (the royal we) make a Grinch wreath, I was all for it! My niece LOVES Dr. Seuss (she owns some first editions) and she is passing along that love to her son.
Tips and variations for making this The Grinch Inspired Wreath DIY Tutorial:
● This "The Grinch" wreath is far less fussy than many of the others out there. That was by choice. This wreath represents his heart growing three sizes (hence the bursting pipe cleaners) when he comes to fully accept the meaning of Christmas. Hubby saw the tulle color on the wreath (with nothing else on it), and immediately said, "A Grinch wreath!" It was easily recognized even without the heart and hat!
● Dr. Suess is well known for heavy black lines. You will note that on the hat. Do not skip that step.
● Tulle is significantly more difficult to work with than material. Keep that in mind.
● You want your wreath nice and full. If you skimp, you cannot hide it. Make sure your matted tulle is nice and full!

The Grinch Inspired Wreath Materials:
● 100 yards Flat Tulle on a Spool (light green)
● 18″ Wreath Frame
● Glue Gun
● 2 sheets Red Sparkle Scrapbook Paper
● White Felt
● Red Felt
● Pipe Cleaners
● Fiberfill
Print these out:
● Bottom of Grinch Hat
● Top of Grinch Hat
● When printed out, you will end up cutting the paper and taping it together to form the hat pattern on your red felt.
● Grinch Hat Band
● Grinch Hat Poof
● Heart
The Grinch Inspired Wreath Tools:
● Hot Glue Sticks
● Scissors
● Ruler or Tape Measure
● Pencil

The Grinch Inspired Wreath Directions:
● Cut green tulle into 5″ strips. You will get 180 strips per 25 yard roll.
● Using the 6″ side of the tulle, tie a square knot (left over right and under, right over left and under) around one of the frame times.

● Push together after each knot.
● Use all 720 strips. Your wreath will be nice and full, but not squished.

● Trace the heart out onto the sparkly red scrapbook paper. Cut out two hearts, one from each sheet. You need a front and a back.
● Make sure that when you put the white sides back to back, no white shows. Trim if necessary.
Here is the heart pattern:
● Heart

● Twist together two pipe cleaners at the end to form a long pipe cleaner. Repeat.
● Lay down one red heart sparkly side down.
● Lay the long pipe cleaners in the middle of that heart.
● Hot glue the pipe cleaners in place. These are going to be how you attach the heart to the wreath frame (by twisting and hot gluing the pipe cleaners).

● Glue the other heart to the first heart (and over the long pipe cleaners). Make sure the sparkly side is facing forward.

● Twist together two pipe cleaners to form one thicker pipe cleaner. Bend the pipe cleaner so it goes around the outside of the heart. You are going to simulate the heart bursting as it grows three sizes!

● Hot glue in place.

● Place the heart into the center of the green tulle wreath.
● Twist the extended center pipe cleaners onto the wreath frame. Hot glue if desired.

● Trace the hat onto the red felt.
● Cut out two hat pieces (both top and bottom, you want a front and back). Make sure you cut out the dart too!
● Note: This tutorial made this as a left-facing hat – make sure you determine if your hat will be on the right or left side of your wreath before going any further!
● Glue together the sides of the hat (do not glue the bottom).
Here are the hat patterns:
● Bottom of Grinch Hat
● Top of Grinch Hat
● When printed out, you will end up cutting the paper and taping it together to form the hat pattern on your red felt.

● Glue the dart down.

● Trace the poof onto the white felt.
● Cut out the poof.
● Attach to the end of the hat.
● Trace the headband onto white felt.
● Attach to the red hat with hot glue.
Here are the headband and poof patterns:
● Grinch Hat Band
● Grinch Hat Poof

● Take a black sharpie marker and trace a few THICK lines onto the hat. Trace the edges, trace the white band, trace a crease near the dart.

● Cut two pipe cleaners in half.
● Insert 2 halves at each corner of the hat, hot glue in place (these will attach your hat to the wreath, so make sure they are long enough to do that while being secure inside the hat).
● Insert a small amount of fiberfill into the hat.
● Dab some hot glue on the bottom so the fiberfill will not come out (you can do the whole line if you like).
● Attach the hat to the wreath. This is a left-facing hat so it will go on the left side of the wreath. If you need your hat to face right, make sure you have turned it right after cutting.

● Display!
● Note that I did not bother with a hanger. You definitely could if you wanted one. This is fairly light so it could be as simple as a pipe cleaner twisted on the back of the wreath and then twisted tight to form a hanger.

Prep Time 1 hour
Active Time 1 hour
Total Time 2 hours
Difficulty Medium
Estimated Cost 20.00
Tools
- Glue Gun
- Scissors
- Ruler or Tape Measure
- Pencil
Instructions
- Cut green tulle into 5″ strips. You will get 180 strips per 25-yard roll.
- Using the 6″ side of the tulle, tie a square knot (left over right and under, right over left and under) around one of the frame times.
- Push together after each knot.
- Use all 720 strips. Your wreath will be nice and full, but not squished.
- Trace the heart out onto the sparkly red scrapbook paper. Cut out two hearts, one from each sheet. You need a front and a back.
- Make sure that when you put the white sides back to back, no white shows. Trim if necessary.
- Here is the heart pattern: Heart
- Twist together two pipe cleaners at the end to form a long pipe cleaner. Repeat.
- Lay down one red heart sparkly side down.
- Lay the long pipe cleaners in the middle of that heart.
- Hot glue the pipe cleaners in place. These are going to be how you attach the heart to the wreath frame (by twisting and hot gluing the pipe cleaners).
- Glue the other heart to the first heart (and over the long pipe cleaners). Make sure the sparkly side is facing forward.
- Twist together two pipe cleaners to form one thicker pipe cleaner. Bend the pipe cleaner so it goes around the outside of the heart. You are going to simulate the heart-bursting as it grows three sizes!
- Hot glue in place.
- Place the heart into the center of the green tulle wreath.
- Twist the extended center pipe cleaners onto the wreath frame. Hot glue if desired.
- Trace the hat onto the red felt.
- Cut out two hat pieces (both top and bottom, you want a front and back). Make sure you cut out the dart too!
Note: This tutorial made this as a left-facing hat – make sure you determine if your hat will be on the right or left side of your wreath before going any further! - Glue together the sides of the hat (do not glue the bottom).
Here are the hat patterns:
Bottom of Grinch Hat
Top of Grinch Hat - When printed out, you will end up cutting the paper and taping it together to form the hat pattern on your red felt.
- Glue the dart down.
- Trace the poof onto the white felt.
- Cut out the poof.
- Attach to the end of the hat.
- Trace the headband onto white felt.
- Attach to the red hat with hot glue.
Here are the headband and poof patterns:
Grinch Hat Band
Grinch Hat Poof - Take a black sharpie marker and trace a few THICK lines onto the hat. Trace the edges, trace the white band, trace a crease near the dart.
- Cut two pipe cleaners in half.
- Insert 2 halves at each corner of the hat, hot glue in place (these will attach your hat to the wreath, so make sure they are long enough to do that while being secure inside the hat).
- Insert a small amount of fiber fill into the hat.
- Dab some hot glue on the bottom so the fiberfill will not come out (you can do the whole line if you like).
- Attach the hat to the wreath. This is a left-facing hat so it will go on the left side of the wreath. If you need your hat to face right, make sure you have turned it right after cutting.
- Display!
- Note that I did not bother with a hanger. You definitely could if you wanted one. This is fairly light so it could be as simple as a pipe cleaner twisted on the back of the wreath and then twisted tight to form a hanger.
Notes
The hat and heart patterns are pdfs. You will need adobe acrobat or a similar pdf program to print them out.
If you like making your own holiday wreaths, you will love these Christmas wreath DIYs:
● Candy Cane Wreath DIY Tutorial
● Christmas Elf Wreath Tutorial
● Cranberry Holly Winter White Wreath DIY
● For more Holiday posts on Ann's Entitled Life, click here.
● For more Craft posts on Ann's Entitled Life, click here.
● If you enjoyed this post, be sure to sign up for the Ann's Entitled Life weekly newsletter, and never miss another article!
How to Make a Grinch Out of Wood
Source: https://www.annsentitledlife.com/holidays/the-grinch-inspired-wreath-diy-tutorial/
0 Response to "How to Make a Grinch Out of Wood"
Post a Comment